Six steps procedure for corrective and preventive action
- Published on: May 15, 2022
Corrective and preventive action, typically named CAPA, is conducted at the implementation stage of most quality concern investigations in GMP environment. Corrective actions are identified and implemented as the outcomes of investigations such as deviations, complaints, laboratory out of specification results or internal – external audit observations and non-conformances.
What is Corrective Action?
By definition corrective actions are required to eliminate the causes of an existing non-conformity, defect or other undesirable situation in order to prevent recurrence of the defect. Corrective actions are taken to fix a defect on hand.
What is Preventive Action?
Preventive actions, on the other hand, are implemented in order to prevent potential non-conformances in future. Preventive action is taken to fix the cause of a problem before it can happen. The future risk mitigation measures are clear examples of preventive action.
Corrective and preventive action example
Consider a situation occurring in a processing line where printing operation was undergoing on a lot of unfilled cartons to imprint manufacturing and expiry dates. During the printing operation, QA inspection has found the expiry dates on some cartons appeared illegible and ink was smudged.
The problem was notified to Supervisor. As an immediate corrective action, the printing operation was halted. Printing line was separated from other nearby lines. A hundred percent inspection has revealed that about 20% of the printed cartons have the same defect. Defective cartons are quarantined.
After the root cause investigation, it was identified the printer was doing its job correctly. However, the specified printing area on the carton was too glossy for printer to make clear impressions. Due to glossy layer the ink was also smudging.
As a corrective action, the defective packaging (carton) lot was destroyed which was initially quarantined. The entire unused packaging lot was removed from the line, quarantined and returned to supplier. A fresh lot of unprinted cartons was issue and introduced which produced nil defect.
As a preventive action, supplier of the carton was contacted and presented the issue. Supplier has taken action in their manufacturing process to improve the printing area which will stop recurrence of the printing defect.
240 SOPs, 197 GMP Manuals, 64 Templates, 30 Training modules, 167 Forms. Additional documents included each month. All written and updated by GMP experts. Checkout sample previews. Access to exclusive content for an affordable fee.
How to implement corrective and preventive action
GMP sites should establish and maintain standard operating procedures for corrective and preventive action activities to assure all incidents of nonconformity are identified, reported and investigated. Root cause analysis tool is used for non-conformance investigation which leads to identification of corrective actions. Effectiveness of the implemented corrective actions should be evaluated periodically to ensure same incident would not occur in future.
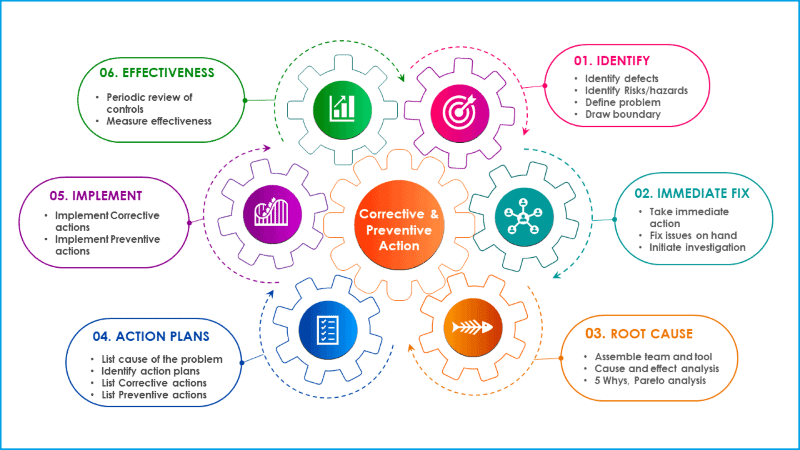
In general, corrective and preventive action process follows sequential steps starting from identification of the problem, root cause analysis, identify mitigation actions and follow up the effectiveness of CAPA. Corrective and preventive process includes the following sections in chronological order.
Step 1: Define the problem
This is the first section of corrective and preventive action process. At this you should be asking a series of questions in order to define the problem, its history and to outline any work that has been done so far. Typical questions during the defining stage are:
– What is the problem / incident? (record exactly what actually happened)
– When did it happen? (record the date and time of incident)
– Where did it happened? (to record specifically what process, equipment or facilities were impacted)
– Who was working when the incident was discovered? (record who had found the incident first time)
Step 2: Immidiate fixes
In this step you should measure the gravity of the problem. You should determine the scope and boundary of the problem. An understanding of immediate actions is prepared. Following questions are helpful to understand what immediate steps are taken and why.
– What actions are taken immediately to fix the problem? (to record briefly the actions taken and by whom?)
– How long did it take to fix the problems? (to determine incident lost time)
– Has this happened before? (to identify history or trend on similar incident)
– What actions were taken before? (to record any changes made previously)
– Which area of the processing line has been impacted?
– Are immediate actions sufficient to fix the issue?
Step 3: Root cause analysis
At this step you as part of the investigation team should carry root cause analysis. Typically called cause and effect analysis (Fishbone diagram, also known as Ishikawa diagrams). The process starts from adding the effect (defined problem) at the front of the fish head and create branches of possible causes from the six process areas and systems.
Participants brain storm on each of six broad categories or systems which are:
– Machine
– Methods
– Measurements
– Materials
– People, and
– Environments
A fishbone diagram is a visual tool and the exercise is particularly helpful in identifying possible categories of causes of a problem which might otherwise be not too obvious. Try to avoid the trap to land into a conclusion early based on someone’s idea of what might have happened as opposed to what has actually happened.

Try our FREE online GMP Skill Booster tests. It’s challanging, it’s refreshing and it’s FREE. Try now!
The investigation team picks the possible causes of the problem marked on the Fishbone diagram. You should then spread down each of the potential causes by asking the question “WHY” up to five successive occasions or up to the point the participants feel the best possible root cause is already attained.
The team also brainstorms all the possible causes of the problem. You should ask “Why does this happen?” As each idea is answered, a branch is drawn on the fishbone. Document every step of the investigation and findings.
You can write the causes in several places if they relate to several categories listed above. Again asks “Why does this happen?” for each category. Write sub-causes by branching off the bones.
Continues to ask “Why?” and generate deeper levels of understanding of causes. This will help you to identify and then address root causes to prevent future problems.
If found beneficial include a Pareto analysis can be done separately to show the fewest (20%) most significant causes which have been causing the highest (80%) level of effects.
Step 4: Prepare action plan
When you will reach to the potential solutions group them in order of difficulty to implement. Not every solution would have equal impact on eradicating the root cause. Some are easy to implement and potential improvement is significant. Some are harder to implement and possible return on investment would be less significant.
You and the investigation team should come with a list of action plans (corrective and preventive actions) and justify which would have the most practical impact on removing the defects.
Step 5: Implement action plan
Once the corrective and preventive action plans are prepared, you should implement the action plans. For instance, you can undertake a list of process improvement works targeting the elimination of causes that have resulted in the defect.
Some preventive actions which are beneficial over the long term can also be implemented at the same time to prevent potential similar type of other defects.
Step 6: Follow up action plan
The final stage of corrective and preventive action process is to periodically follow up the effectiveness of the actions implemented earlier. You should prepare a schedule to revisit the corrective and preventions and check if the plans were not deviated from the target. Also you should measure if the root causes have been eliminated completely from the process.
Areas where corrective and preventive actions can be taken
The CAPA system shall be comprehensive. You should include analysis of the following areas as applicable to the product or GMP site:
– Manufacturing processes
– Work operations and scrap rates
– Quality audits
– Quality records (e.g., nonconforming product records, stability studies, analytical laboratory investigations, inspection and test records)
– Complaints
– Returned products
– Deviations or concessions
– Adverse events/medical device reports
– Management reviews
– Field alerts or advisory notices; and
– Supplier data
Other aspects to consider during CAPA exercise
Where necessary you should include statistical methodology to detect recurring quality issues.
The corrective and preventive action should be verified or validated in accordance to pre-established and approved specifications to ensure that such action is effective and does not adversely affect the quality of finished product.
The significance of the product and any hazard associated with the defective product shall be taken into consideration when determining the corrective and preventive action to be taken. A risk analysis shall be performed to determine significance of the defective device and hazard, if necessary. You should document the risk analysis methodology and mitigation actions.
You should prepare failure analysis to the level necessary to determine the root cause of the nonconformity (e.g., a defective component or raw material). Keep all the record of the investigation, follow-up and conclusion.
CAPA Information shall be submitted for periodic Management Review. CAPA activities shall be documented and supporting documentation maintained in accordance to site record retention practices.
If changes are required to make as part of corrective and preventive action process, those changes shall be assessed for further process impacts. Changes shall address and are not limited to, the following:
– Methods and procedures,
– Design,
– Personnel training, and
– Specifications
Information related to quality issues or nonconforming product shall be communicated to the following as applicable to the issue and/or product:
– Personnel directly responsible for assuring the quality of the applicable product or the prevention of such problems;
– Management; and
– Regulatory Authorities and/or Notified Bodies.
The impact of a nonconformity on other production units, lots or similar products shall be assessed. A documented investigation shall include evaluation of and not limited to, the following:
– Manufacturing processes;
– Quality processes;
– Failed components;
– Design related issues; and
– Process anomalies.
Design Deficiencies detected as a result of a nonconformity investigation shall be corrected in accordance with the documented design control and change control standards and procedures.
Corrective and preventive action documentation
CAPA Documentation shall include:
– Description of the nonconformity, including identification of the Batch or lot affected;
– Scope of the nonconformity including any other product, batches, or lots potentially impacted by the nonconformity;
– Risk or hazard assessment associated with the nonconformity;
– Root cause investigation;
– Corrective actions taken (short-term and long-term);
– Preventive actions taken (short-term and long-term);
– Conclusion, including Disposition of the impacted batch (es) or lot(s);
– Verification or validation to demonstrate effectiveness;
– Follow-up activities
– Identification of person(s) conducting the investigation;
– Date of investigation;
– Signature of site quality team approving the CAPA report and date of Approval.
Summary
Corrective and preventive action process is an important technique to identify defects and implement actions to eradicate the causes of the defects. CAPA analysis is synonymous to continuous quality improvement. The method is not hard to follow and widely used during quality investigations. However, sometime inexperienced team can quickly jump into conclusion which produces no real improvement and defects keep coming back.

Author: Kazi Hasan
Kazi is a seasoned pharmaceutical industry professional with over 20 years of experience specializing in production operations, quality management, and process validation.
Kazi has worked with several global pharmaceutical companies to streamline production processes, ensure product quality, and validate operations complying with international regulatory standards and best practices.
Kazi holds several pharmaceutical industry certifications including post-graduate degrees in Engineering Management and Business Administration.
Related Posts

Overview of GLP requirements on everyday laboratory operations
Supplier Assessment Procedure for GMP Facility
Deviation Investigation Guidelines in GMP Facilities


Would you please send me six steps it helpful.
Thank you for this article to that very important topic.
Is it possible to take parts of that article , and more important the grafic, to another document?
Hi, thanks for the nice comment. You can select the graphic’s code from https://www.gmpsop.com/embed-code-gmpsop/ and paste the code to any of your webpage editor to show up exactly as they are on the post. If you need a printed version of the post we can send it over to you. Please reply on this message or contact us with your email to contact.
Are you ablate share a reprint of this article. It’s superb.
Sure, thanks. We will send a printable copy to you.