
What is acceptable quality limit and how to use AQL in sampling
- Published on: Sep 22, 2022
What is the acceptable quality limit?
According to ISO 2859, the Acceptable Quality Limit (AQL) is the “Quality level that is the worst tolerable process average when a continuing series of lots is submitted for acceptance.”
Acceptable Quality Limit is used to make an informed decision whether to accept or reject an incoming packaging components lot by assessing the lot size and types of defects found during a pre-determined level of inspection.
Acceptable quality Limit (AQL) sampling method can also be used in any production process to determine if the produced batch is suitable to accept or reject by the quality assurance.
The sampling inspector must know the following information to come to a methodical conclusion.
– Lot size (quantity)
– Inspection levels/sampling plan (i.e., Reduced I, Normal II, or Tightened III)
– Defect classifications (i.e., Critical, Major, or Minor)
– AQL level corresponding to inspection & defect levels
– Sample size corresponding to inspection & AQL levels
– Determine Acceptance point
– Determine Rejection Point
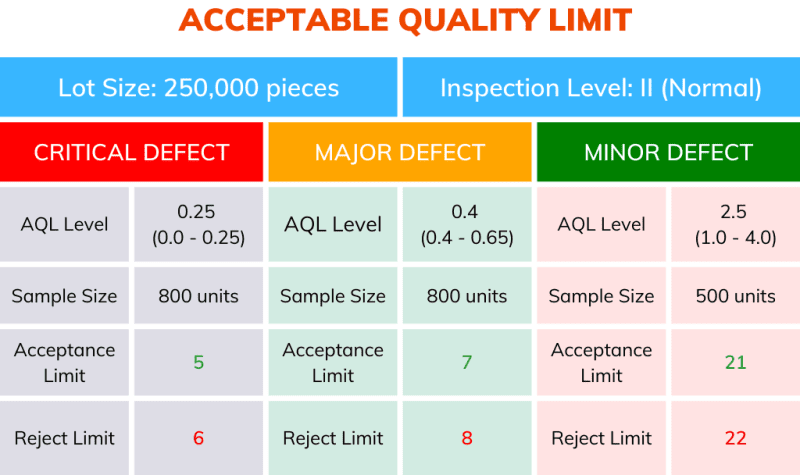
Based on the exercise above, a plan can be generated for sampling and acceptance limit, which resembles the table below:
240 SOPs, 197 GMP Manuals, 64 Templates, 30 Training modules, 167 Forms. Additional documents included each month. All written and updated by GMP experts. Checkout sample previews. Access to exclusive content for an affordable fee.
It is important to consider that the sample size and accept and reject limits are variables. They depend on lot size, inspection levels, and AQL.
The AQL is used with the inspection levels to determine the number of cartons to open, sample size, and quantity of acceptable defects.
The acceptable quality limit varies depending on the type of defect (Critical, Major, and Minor) sampled. A critical defect has a lower limit than those considered minor.
What are the types of defects and their AQL?
Critical Defects (AQL: 0~0.25%)
A defect that would result in hazardous conditions for individuals using, maintaining, or depending upon the product.
Following is a list of Critical Defects typically found in incoming packaging lots:
Delivery:
– Delivery damaged or contaminated, and the component can’t be used
– Bag/Sack is cut, crooked, or ragged, and the component can’t be used
– Splice tap on the safety seal
Appearance:
– Internal or External surface foreign matter, rust, or corrosion can interact with products.
Printing:
– Missing or unreadable printing, which may be detrimental to the consumer
– Incorrect printing
Major Defects (AQL: 0.4~0.65%)
A defect is likely to result in failure or materially reduce the product’s usability for its intended purpose.
Following is a list of Major Defects typically found in incoming packaging lots:
Delivery:
– Seals not present
– Missing polyethylene liner bag
– Missing, illegible, or incorrect pallet markings.
– Missing plastic protection bag
– Wrong delivery quantity
– Not labeled with site order no / code no / component description
Appearance:
– Pinhole, pitting, scuffing, streak, nicks, embedded foreign matter, split.
– Cracks, chips, blisters
– Water damaged
– Gloss-free are missing
The component is not the correct shape (square, triangle, rectangular, etc.)
– Visual defect that affects the use or elegance
– Anti-counterfeit labels are not in the quantity specified, are not positioned as per artwork, and are easily removed.
Dimension:
– Core inside diameter is under or exceeds specification
– Dimensions are too large or too small
– Wind is too loose or too tight
– Volume is under or exceeds specification
– Incorrect angle (bottles)
Printing:
– Colour is out of color standard
– Registration marks are not correct or in the exact position
– Barcode / EAN / Pharmacode is incorrect, unreadable, or in the incorrect position
– Colour misplaced / not used as per specification
– Tape test failed
– Missing color
– Spelling is incorrect
– Edge Barcode is not showing
– Missing or unreadable printing, which may not be detrimental to the consumer
– Incorrect printing
Assembly:
– Glue line becomes unstack during testing
– Cartons not opening correctly
– Bottles threads malformed
– Uneven base
– Folded incorrectly
– Not Uni Bi-oriented as per specification
– Knifing/cutting is not as per artwork
– Doesn’t assemble properly
Materials
– Material is different than specified
– Mixed / Incorrect ID number (PM#) used
– Incorrect type of board/paper/foil / PVC / PVDC / Shrinkwrap
– Component split/break/crack during inspection
– Negative ID using Pyridine spot test
Minor Defects (AQL: 1.0~4.0%)
A defect that is not likely to materially reduce the product’s usability for its intended purpose.
Following is a list of Minor Defects typically found in incoming packaging lots:
Delivery:
– Missing Certificate of Compliance.
– Stacking higher than 1.4m
– Not in rows or stacked on their sides.
– Laid flat on top of rows
– Wrapping / Bands used
– Shippers are overfilled and bulging
Appearance:
– Visual defects that do not affect the use or elegance
– Clarity is not as per the specification
– Flashes / Loose Flashes (bottles and caps)
– Torn, distorted or soiled
Dimension:
– Diameter is under or exceeds specification
– Thickness is out of specification
Printing:
– Roll marking faded/missing or off-pitch
– Packaging material code incorrect or not in the exact position
– Not sequentially numbered
– Missing ID with black marker (joins on foil)
– Defaced
Assembly:
– Incorrect board direction
– Internal closure coating is missing, put, or flaking
– Metal sliver unattached or attached at one end only, 1/8 longer or shorter
– Missing or partial tube liner
– Glue line is slightly out of parallel
– Cuts are marginally crooked or ragged, but the component can be used
– Not affixed as per artwork
– Not packed in shippers
– Joins are not as per specification or exceed the allowed quantity
– Flags not present
Weights:
– Weight is out of specification
Materials
– Adhesive type is not according to specification
– Not coated as specification
Try our FREE online GMP Skill Booster tests. It’s challanging, it’s refreshing and it’s FREE. Try now!
What inspection levels to use?
GMP Production facilities employ three types of inspection levels at the time of packaging material sampling. Those are:
– Reduced inspection plan (Level I)
– Normal inspection plan (Level II) &
– Tighten inspection plan (Level III)
Follow the rules below to determine the required level of inspection:
– For a new supplier of packaging materials, use tightened inspection.
– For an existing approved supplier of packaging materials, use either normal inspection or reduced inspection.
– To determine the appropriate level of inspection for a particular packaging material delivery, review the material delivery history chart for the previous delivery of this class of component from the supplier.
The Sampling Inspector would have recorded this along with defect levels when performing the previous inspection.
– When necessary, switching sampling inspection levels between normal, reduced, and tightened inspections.
– After determining which sampling plan to use, check the particular sampling plan table to determine how many containers (cartons/shippers) need to be opened for sampling based on the number of containers in the delivery.
Switching of sampling inspection plans
1. Tightened Inspection, switching to Normal Inspection
When the tightened inspection is in effect, normal inspection will apply for the next delivery when five (5) consecutive lots of packaging materials have been considered acceptable from a given supplier for a given class of products.
2. Normal Inspection switching to Tightened Inspection
When normal inspection is in effect, tightened inspection will apply for the next delivery when two (2) out of five (5) consecutive lots of packaging materials from the same supplier have been rejected for a given class of products (only original lots considered, not re-submitted lots).
3. Normal Inspection switching to Reduced Inspection
When normal inspection is in effect, reduced inspection will apply to the subsequent delivery if the previous ten (10) or more consecutive lots of packaging materials from the same supplier have been approved on normal inspection for a given class of products.
4. Reduced Inspection, switching to Normal Inspection
When reduced inspection is in effect, normal inspection will apply if any of the following occur:
i. A lot of packaging material needs to be accepted.
– When the previous delivery of packaging materials from an approved supplier occurred more than 12 months ago.
– If many packaging materials are tested under reduced inspection and found to exceed the accepted level of defects but are below the reject level, they will be accepted. Still, the following delivery will be tested under normal inspection.
ii. If Quality Assurance advises that normal inspection should be applied to the given supplier.
Determination of sample size and accept/reject limits
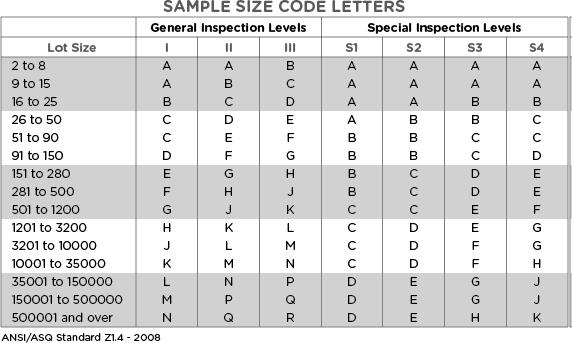
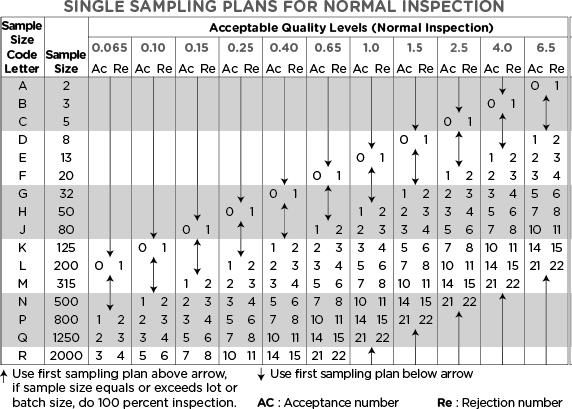
Now that we understand the defect classifications, various inspection levels, and AQL levels to apply based on the Inspection & Defect class, we can determine the required sample size and acceptance limit using the following two tables.
Source: www.qima.com
240 SOPs, 197 GMP Manuals, 64 Templates, 30 Training modules, 167 Forms. Additional documents included each month. All written and updated by GMP experts. Checkout sample previews. Access to exclusive content for an affordable fee.
Let’s take the example presented earlier in the article to demonstrate how the tables are used in different circumstances.
AQL demonstration:
In a hypothetical inspection of a production or incoming packaging lot with 250,000 units, the sampling inspector has selected the normal inspection level (II).
In Table 1 above, the intersection of the respective lot size and normal inspection level (II) indicates the sample size code letter P.
Then, referring to Table 2, we locate row P, which indicates the required sample size of 800 units.
For a Critical defect, if the AQL is set to 0.065, no more than 1 unit from that sample size can fail inspection. (Table 2).
For a Major defect, if the AQL is set to 0.4, no more than 7 units from that sample size can fail inspection. (Table 2).
If the AQL is set to 1.0 for a Minor defect, no more than 14 units from that sample size can fail inspection. (Table 2).
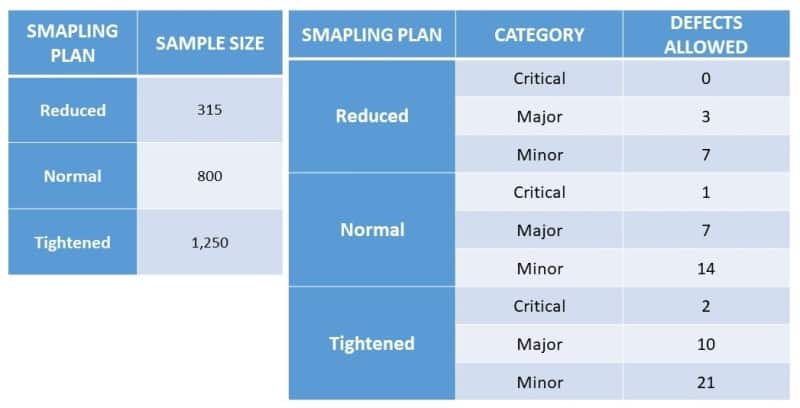
In summary, for a delivery of 250,000 units, according to the different sampling plans and the level of defects, the maximum allowed defects per sample can be shown below.
Conclusion:
During random sampling of quality inspections, the Acceptable Quality Limit (AQL) tells you the maximum number of defective products will determine if the lot will be acceptable.
During the sampling process, it is important to assess the inspection level and classification defects correctly to incorporate correct value of Acceptable Quality Limit.
Using the table and formula provided in this article, you can easily determine sample sizes and accept/reject limits for different inspection levels.
It is also important to recognise that failing an inspection does not automatically disqualify a lot.
All out-of-specification incidents must be recorded as deviations, and further investigation will be required to conclude lot disposition.
Please share your thoughts on this topic using the comment section below.

Author: Kazi Hasan
Kazi is a seasoned pharmaceutical industry professional with over 20 years of experience specializing in production operations, quality management, and process validation.
Kazi has worked with several global pharmaceutical companies to streamline production processes, ensure product quality, and validate operations complying with international regulatory standards and best practices.
Kazi holds several pharmaceutical industry certifications including post-graduate degrees in Engineering Management and Business Administration.
Related Posts
Chromatographic systems used in Pharmaceutical Laboratories
How to test, adjust and balance HVAC systems
How to conduct a root cause investigation using DMAIC principle



Can we do online aql
Hi, apology, we do not have an online AQL calculator. You can use the ISO published tables (as posted here) to calculate your %AQL. Nevertheless, you can find an online calculator on the site https://www.qima.com/aql-acceptable-quality-limit.
Hi there, I am confuse by erro, my total quantity is 120000 PCs, inspection level is 2.5 general inspection level 2, what would be the sample size, 800 PCs or 500 PCs. Pls adv
Hello Yasir, if your total lot qty is 120,000 ea, then your sample size code letter will be (N). Now please look at the second table “Sampling plan for normal inspection”. For AQL (1.0 to 2.5), the sample size will be 500 units – corresponding to the letter N. The Accept and reject limits will vary as you will change the AQL level. If you will set the AQL 4.0, the sample size would become 315, the next level up in the table. You will not need a sample size of 800 units for that lot size.
Does AQL 1 % mean the lot of 250, 000 have a defect 1 percent?
Hi Chong, AQL 1% does not mean an acceptable defect is 1%. you can set the AQL between (1 and 4)% if the defect falls into minor category. In such case, if your batch size is 250,000 units, and you chose a general inspection level II (commonly used for minor defects), your sample code will be P and the sample size will be 800 units. Checking at the sampling plan table, no more than 14 (out of 800) can be failed to accept the batch.